...
Step 1. Select a template.
1. Select Content.
2. Select Dynamic content.
3. Click Create a new dynamic content.
...

...
...
...
The
...
screen below
...
appears.


4. Enter the
...
Name of your dynamic content. For our example:
...
Test ZZZ.
5. Enter the Description of your dynamic content. For our example:
...
Product.
6. Select your template (s). By default, PUBLITRAC offers eight templates, but can also upload your own templates (see article under 3 - Content and customization / Templates). From the choice of templates displayed to the left of the screen, drag the template of your choice to the yellow box on the right of the screen (or click on the + at the bottom right of the template). You can select several templates according to your needs. Depending on the position where the dynamic content will appear on your emails, you may need different formats, therefore, different templates for the same content.
7. Click Next and proceed to step 2.
Step 2. Create a default content (content that will be sent to the leads that do not correspond to the targeted attribute and/or interest and/or targeted history)
By clicking Next in the previous step, you come back to the Create a new dynamic content interface.
The
...
screen below
...
appears.

1. Select
...
Create Default Content.
The
...
screen below
...
appears.


2. Enter the Title of your default content. In our example:
...
Test ZZZ. This title appears in the preview to the right of your screen. It also appears in the Tile (image) inserted in the email sent to your lead.
3. Enter the Description of your default content. In our example:
...
Product Description. This description is displayed in the preview to the right of your screen. It also appears in the Tile (image) inserted in the email sent to your lead.
4. Insert the image of your default content. Click on the
...
 pictogram to the right of the Path to the image field to access the images saved under Content / Images and documents (a - select the file containing the image you want from the drop-down; b - click on the image of your choice; c - click Select to have the image integrated to the dynamic content). The selected image will be displayed in the preview to the right of your screen.
a. Select the file containing the image you want from the drop-down menu.

b. Click on the image of your choice
c. Click Select to have the image integrated to the dynamic content
...

5. Indicate an Alternative text to describe your image. In our example: Alternative text to describe the image. This text is used for the purpose of referencing (SEO) for search engines who cannot see the images. The alternative text allows search engines to get an idea of what is on the image.
6. Indicate a URL link if you want your image to contain a link which will direct to a specific web page. In our example, we added a link to http://www.publipage.com so that the image, which is the logo of PUBLITRAC, directs to the Publipage site if a user clicks on this image.
7. Click Next and proceed to step 3.
Step 3. Create specific content for profile A.
...
By clicking Next in the previous step, you go back to the Create Dynamic content creation Content interface.
The
...
screen below
...
appears.

1. Select Create a new content.
The
...
screen below
...
...
appears.


2. Enter the
...
content name. In our example: Product A for men
3. Enter the content title
...
. In our example: Discover our new product for men. This title appears in the preview to the right of your screen. It also appears in the Tile (image) inserted in the email sent to your lead.
4. Enter the
...
content description. In our example: More than a man's product. This description is displayed in the preview to the right of your screen. It also appears in the Tile (image) inserted in the email sent to your lead.
5. Insert the Image of your Product A. Click on the pictogram to the right of the Path to the image field to access the images saved under Content / Images and documents (a - select the file containing the image you want from the dropdown; b - click on the image of your choice; c - click Select to have the image integrated to the dynamic content.) The selected picture will be displayed in the preview to the right of your screen.
a. Select the file containing the image you want from the drop-down menu.
...
...

b. Click on the image of your choice
c. Click Select to have the image integrated to the dynamic content

6. Enter an alternative text to describe your image. In our example:
...
car man. This text is used for the purpose of referencing (SEO) for search engines who cannot see the images. The alternative text allows search engines to get an idea of what is on the image.
7. Indicate a URL link if you want your image to contain a link which will direct to a specific web page. In our example, we added a link to http://www.google.ca for the image that is a man's razor.
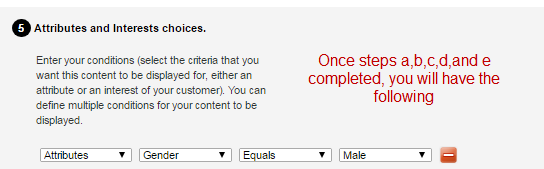
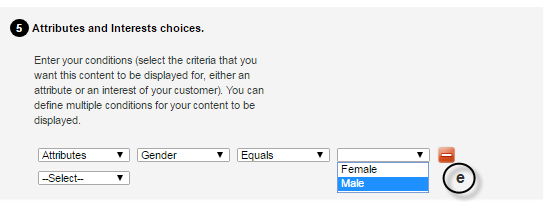
8. Choose the attributes or interests that will allow you to target the leads for this dynamic content. In our example, the men to display the men`s razor. So we choose the attribute gender = man.
a. Open the Select drop-down menu.
b. Choose Attributes
c. Choose the Gender
d. Choose the activity to apply to the gender. Equal or not equal. In our example, Equal.
e. Choose Male (man). Thus, this dynamic content will be displayed for all leads with man as gender.
PUBLITRAC also lets you select Behaviors (lead`s actions) and interests (custom fields).
Behaviors: an action performed by the lead

Interests: custom fields that you create to track specific interests of your leads. For example, you have would have created a custom field to identify leads who have demonstrated an interest in electric razors or those who have shown interest for blade shavers.

9. Click Next and go to step 4.
Step 4. Create specific content for profile B.
...
In our example, profile B will match with the women to who we will send a dynamic content offering a razor van for women.
By clicking Next in the previous step, you go back to the Create Dynamic content creation Content interface.
The
...
screen below
...
appears.

1. Select Create a new content
...
The screen below appears.
...

The window below is displayed.
2 2. Enter the Name of your content name. In our example: Product B for women.
3. Enter the
...
content title. In our example: Discover our new product for women.
This title appears in the preview to the right of your screen display.
It also appears in the Tile (image) inserted in the email sent to your lead.
4. Enter the Description of your default content. In our example: Our best
...
van for women. This description is displayed in the preview to the right of your screen. It also appears in the Tile (image) inserted in the email sent to your lead.
5. Insert the Image of your Product B. Click on the pictogram to the right of the Path to the image field to access the images saved under Content / Images and documents (a - select the file containing the image you want from the dropdown; b - click on the image of your choice; c - click Select to have the image integrated to the dynamic content.) The selected picture will be displayed in the preview to the right of your screen.
a. Select the file containing the image you want from the drop-down menu.
b. Click on the image of your choice
c. Click Select to have the image be included in the dynamic content.

6. Enter an alternative text to describe your image. In our example:
...
van woman. This text is used for the purpose of referencing (SEO) for search engines who cannot see the images. The alternative text allows search engines to get an idea of what is on the image.
7. Indicate a URL link if you want your image to contain a link which will direct to a specific web page. In our example, we added a link to http://www.google.ca for the image that is a woman's razor.
8. Choose the attributes or interests that will allow you to target the leads for this dynamic content. In our example, the women to display the women`s razor. So we choose the attribute gender = woman.
9. Click Next and proceed to the review step.
Revision of your created content
By clicking Next in the previous step, you go back to the Create Dynamic content creation Content interface.
The
...
screen below
...
appears.

1. Every content has a configuration menu
...
 Click on the small black arrow and you will have a choice of actions: Edit or Preview.

2. Select Preview for each of your contents one after another and verify that the good image and good text is displayed in the preview box to the right.
In our example: Default content

Content for Product A (male)

Content for Product B (female)

3.Click on Next
The
...
screen below
...
appears.
...

...
4. Click on Save.
...
5. Your dynamic content is now created and can be used in your email transmissions. See Step 5. Implement dynamic content in an
...
email further down on this page.
...

The emails received will look as follows:
Default profile:
...
To follow
Product A (man):

Product B (
...
woman):
...
...
To follow
Edit a dynamic content
1.
...
Go to Content and click on Dynamic content
...

2. Select Product man. Product woman (we keep the same example).
3 3. Select configure your contents.
4. From the icon ,select Edit, Preview or Remove this content.
5 5. Click Next.
6 6. Click Save.
Step 5. Implement Dynamic content in an email
Once the dynamic content has been created, it needs to be implemented in an email. Dynamic content cannot be applied to a landing page, it is unique to emails. 1
1.Select
...
Content, andthen in the submenu Email.
...

2. Select the email in which you want to integrate the dynamic content.
...

...
3. Place your cursor in the email, in the place where you want to integrate the Dynamic content.
...

...
4 .Click on Dynamic
...
Content
...
5. Select the Content that you just created (or any other content that you want to insert).
...
...

...

The next window with the dynamic content code will be displayed:
...

6. Click Save.
 TIPS
TIPS
- Dynamic contentContent can be implemented on emails only. No dynamic content can be implemented on landing pages.
...